Infusionsoft boasts many fantastic features and can be a beastly piece of software when properly used.
However, there are certain aspects of the software that remains… er, clunky. If it’s possible, this is when a “hack” is sometimes necessary to achieve a smoother customer experience.
If you’re on this blog then you’ll have noticed by now that Infusionsoft’s pre-built double opt-in sequence in the campaign builder is very clunky and just plain old ugly.
It’s impractical with very little room for editing or personalisation. The email itself is still built with the old email builder (again, clunky and yuck!) and the highlighted section in the image below is locked so you can’t edit ANY of its content – including font and size!
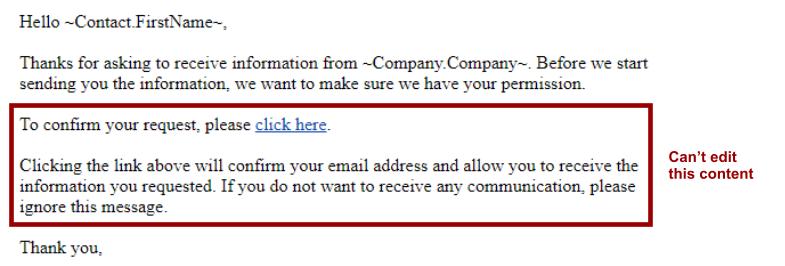 We know that it’s best practice to ask for a double opt-in but no one wants to send out an email THAT ugly (and uneditable)!
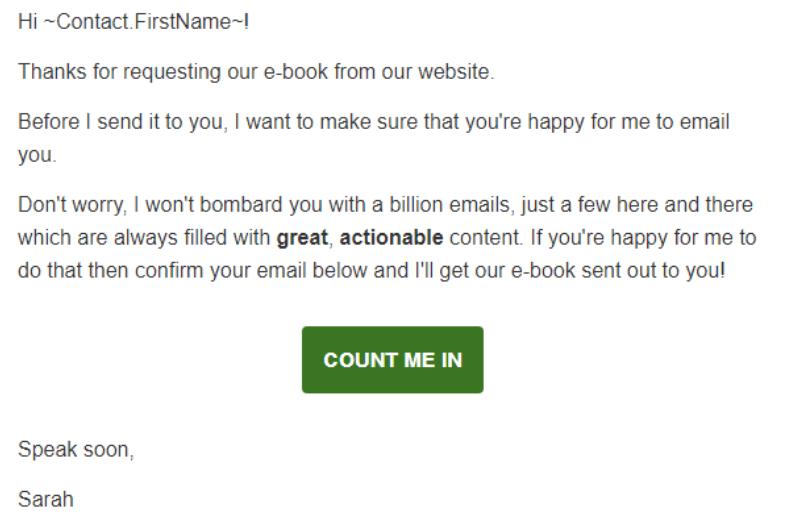
So what can we do?
Well, with a little technical workaround we can get our opt-in emails to look something a little more appealing like this:
 I’m about to walk you through step by step how to create your own fully customisable opt-in (or even opt-out) link.
NB: This method applies to creating your own opt-out links too!
Step 1 – Creating a Custom Automation Link
Under the main navigation menu go to Marketing > Settings > Automation Links
This is where you can create your custom opt-in & opt-out links. The system will already have made default links for you. What we want to do is create new ones to use that are more appropriate.
To the right of the “Confirmation Links” click the Create Confirmation Link button.
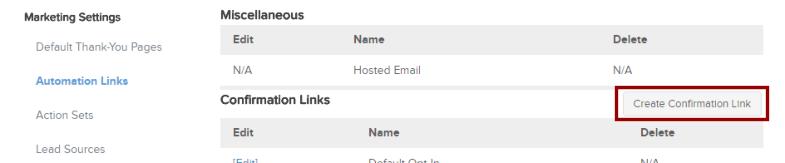
A pop-up will appear and this is where you’ll set up your new link.
All we need to complete in this pop-up is the name for your link. Once you’ve named it, scroll down and click the “Save & Close” button.
Step 2 – Find your Merge Field ID
In Infusionsoft everything has an ID number attached to it (tags, campaigns, broadcasts etc) and our automated links are no different. What we need to do is find our automation link’s ID to create our marge field.
To find your ID hover over the “Edit” link and in the bottom left corner the link location will appear. The number that you see is your merge field. In my screenshot below, my ID is 16.

Now that we know what our ID is, we can make our merge field.
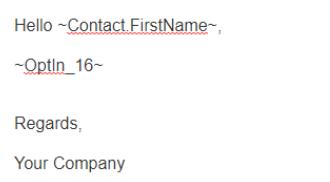
~OptIn_XX~ is the text you need to create this merge field. Where the red X’s are is where you put your ID number. So my merge field will look like this: ~OptIn_16~
Step 3 – Send yourself a test email
To complete Step 4, we need to first send ourselves a test email with the merge field we’ve built in it.
 Go to your campaign builder and build yourself an email. Paste your merge field into your email copy and then send yourself a text email (find the Test button in the top right corner).
When the test email arrives you’ll see that you don’t see the ugly “~OptIn_16~” text, instead Infusionsoft translates that into text with a link.
Click the link and note down the URL that loads. It looks like gibberish but we’re going to break it down in the next step…
NB: We need to create a link to make our opt-in button work, we can’t use the merge field as the link destination for the button as it won’t work
Step 4 – Creating your link
Now the link that you’re looking at may look a bit messy but there’s a structure to it that we need to break down.
My link looked like this:
https://la999.infusionsoft.com/app/optIn/16/f9a681bacf350f8f/43599/5b88708b0f8f02cb
Let’s break down the format of it so we can understand it better…
https://YOUR APPID.infusionsoft.com/app/optIn/OPTIN NUMBER/UNIQUE HASH/~EmailSent.Id~/~EmailSent.PartialHash~
The custom information that we need to identify here is your UNIQUE HASH key. As you can see above, my unique hash key is “f9a681bacf350f8f”. Pick out your unique hash key out of your URL.
Now we need to create YOUR link
Follow the format below and replace the highlighted text with your own details. Keep the merge fields at the end of the url as they are shown below as this is what makes it work for every contact, when building your link these should not be numbers but merge fields.
https://YOUR APPID.infusionsoft.com/app/optIn/OPTIN NUMBER/UNIQUE HASH/~EmailSent.Id~/~EmailSent.PartialHash~
Step 5 – Adding your link to your email
Here’s the fun part – putting all of the above into action!
Go back to your email in the campaign builder and build your opt-in email how you’d like, and then drag on a button widget.
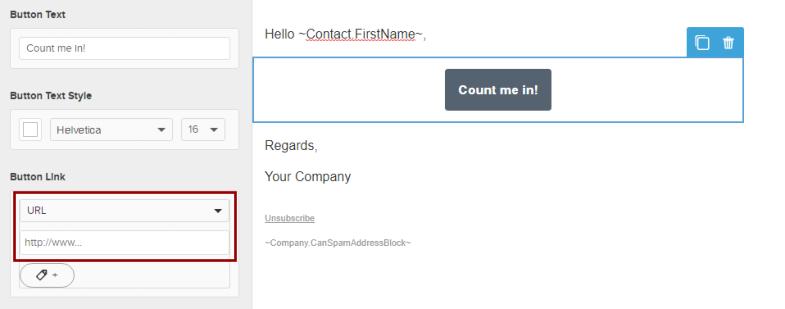 Add your newly-built link as the URL destination for the button and then customise the button how you want it to look.
If you want to be extra ninja then apply a tag to the button configuration so you can search for the contacts who have confirmed their email address.
Step 6 – Test test test!
One of the most important steps in any campaign building or email automation is to TEST!
To effectively test this link, we can’t just use the “Test” button in the top right corner.
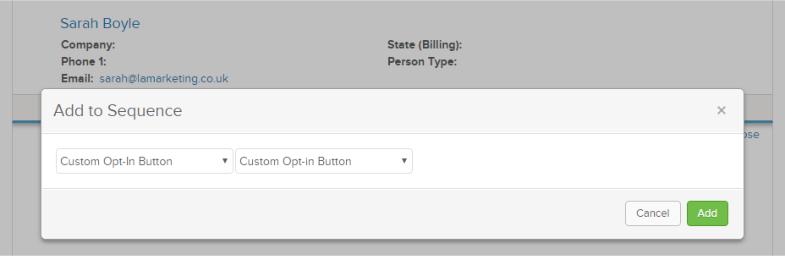
Instead, publish the campaign and search for a contact record you can send the test to. These can be made-up contacts, but you’ll need to have access to the inbox to test the email that comes in. Manually add the contact record into the sequence of the campaign by clicking the “Campaigns” icon in the row below the contact details and then click the “Add to Sequence” button. Find the campaign name and then pick the sequence your email is in.
Once you’ve done this go check your inbox to proof & test the email.
There you have it – you’ve now built your fully customisable opt-in email!
A few things to note:
- This is a useful way to create prettier opt-in emails. This is NOT a way to mislead your leads by not informing them that clicking the confirms their email.
- To ensure you remain in compliance with Infusionsoft’s regulations for the sending of emails and consent, please be sure to specify clearly what it is that your user is consenting to.
Give credit where credit is due
For full disclosure, I take no credit for this incredible hack! The geniuses that are Paul Sokul and Greg Jenkins are fully responsible for this golden information.
Paul Sokul wrote a guest blog on Greg Jenkins website where he explained the learning curve he went through in de-constructing the link format to build an unsubscribe link.
If you get stuck on creating this link for yourself then please feel free to get in touch and I’ll be happy to help you work it out!